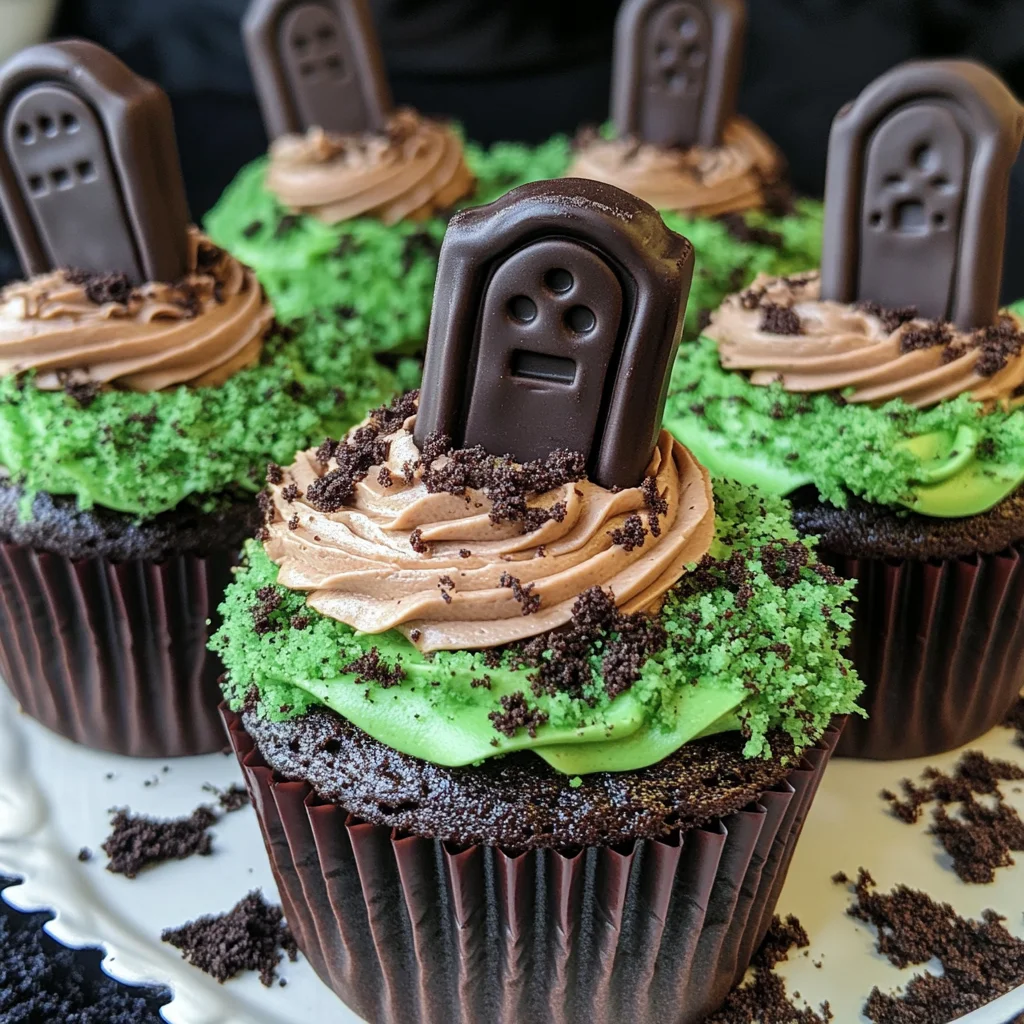
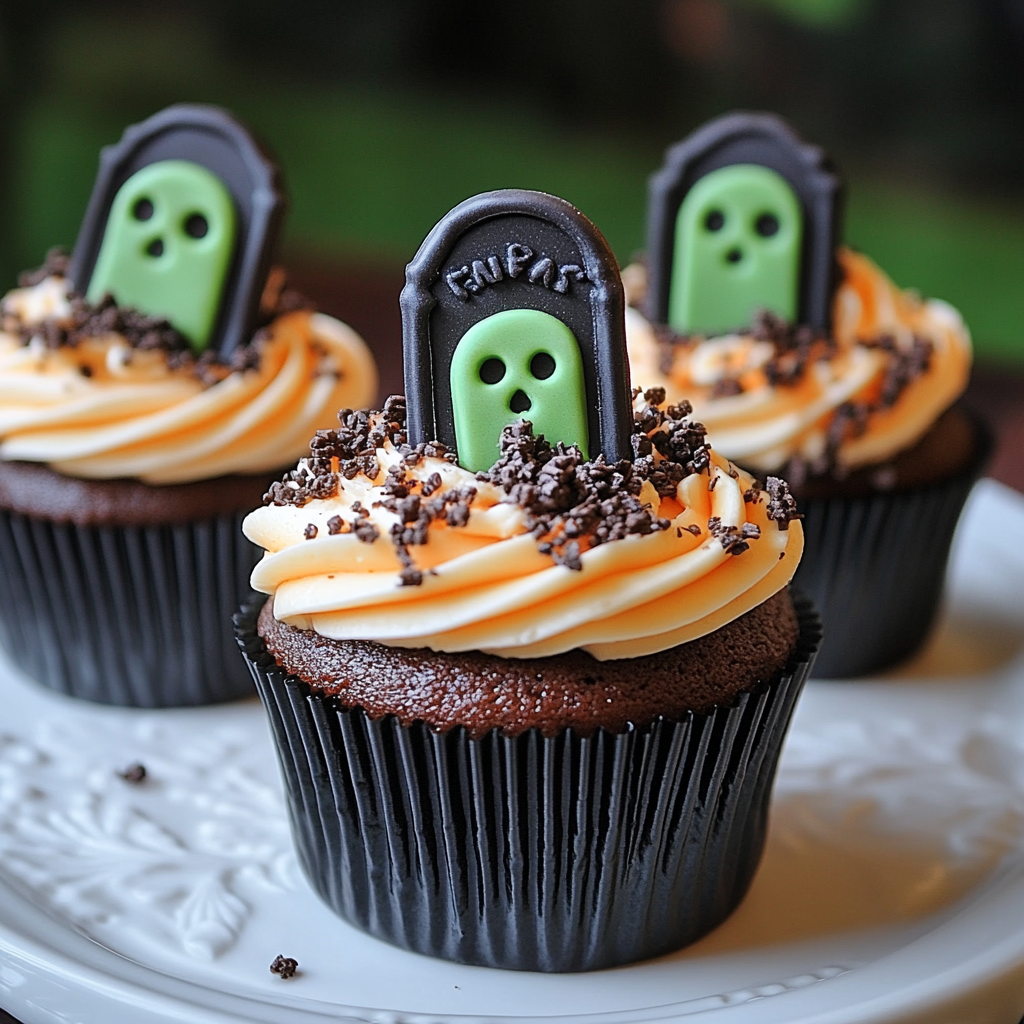
Halloween Graveyard Cupcakes
If you’re looking for a fun and spooky treat this Halloween, you’ve come to the right place! These Halloween Graveyard Cupcakes are not just delicious; they’re also a delight to look at. With their chocolatey goodness, creamy oreo cheesecake filling, and playful decorations, they bring joy to both kids and adults alike. Perfect for parties or family gatherings, these cupcakes will impress everyone. Plus, they’re simple enough that even little hands can help make them!
Why You’ll Love This Recipe
- Fun presentation: These cupcakes look like a graveyard scene—perfect for Halloween!
- Delicious flavors: The combination of chocolate cupcakes with oreo cheesecake filling is simply irresistible.
- Easy to customize: You can change the decorations to suit your style or use different fillings.
- Family-friendly: Everyone will enjoy getting involved in making these spooky treats together.
- Make-ahead convenience: Bake the cupcakes in advance and assemble them on the day for stress-free entertaining.
Ingredients You’ll Need
These Halloween Graveyard Cupcakes use simple, wholesome ingredients that are easy to find. Gather your supplies and get ready to create some spooky magic in the kitchen!
For the Grave Decorations
- 12 Lotus biscoff biscuits
- 150 g Dark chocolate (melted)
- 30 g White chocolate (melted)
For the Cupcakes
- 175 g Baking spread or butter (softened, unsalted)
- 175 g Caster sugar
- 3 Eggs (large)
- 2 tbsp Milk
- 150 g Self raising flour
- 25 g Cocoa powder
- 1/4 tsp Baking powder
For the Oreo Cheesecake Filling
- 115 g Full fat cream cheese
- 15 g Icing sugar
- 15 g Oreos (crushed)
- 1/8 tsp Vanilla extract
For the Chocolate Buttercream
- 100 g Butter (softened, unsalted)
- 165 g Icing sugar
- 35 g Cocoa powder
- 1-2 tsp Milk
For the Green Grass Buttercream
- 25 g Butter (softened, unsalted)
- 50 g Icing sugar
- 1/8 tsp Vanilla extract
- Green food colouring
- 35 g Oreos (crushed)
Variations
This recipe is flexible and can be easily adapted based on your preferences. Here are some fun ideas to mix things up:
- Swap the filling: Instead of oreo cheesecake filling, try a peanut butter or vanilla custard filling for a different flavor profile.
- Change the toppings: Decorate with gummy worms or candy spiders for an extra spooky touch!
- Use different biscuits: If Biscoff isn’t your thing, graham crackers or chocolate digestives work beautifully as well.
- Make it gluten-free: Substitute self-raising flour with a gluten-free blend to accommodate dietary needs.
How to Make Halloween Graveyard Cupcakes
Step 1: Prepare the Biscuit Graves
Start by making your biscuit graves. Snap about a third off each Lotus biscoff biscuit so they fit nicely on your cupcakes. Melt dark chocolate and dip each biscuit into it before placing them on baking paper to set. This step is crucial because it gives your gravestones that delightful chocolate coating.
Step 2: Decorate Your Graves
Once the dark chocolate has set, melt white chocolate and pipe fun designs onto your biscuits. This adds character and charm to your graveyard scene. Let these designs set while you move on to the cupcakes.
Step 3: Preheat and Prepare
Preheat your oven to 140C Fan/160C/325F/Gas Mark 3 and line your cupcake tin with cases. This ensures even baking and helps release those lovely cupcakes later.
Step 4: Make the Sponge Batter
In a large bowl, mix together softened baking spread and caster sugar using an electric whisk until light and fluffy—about five minutes is perfect! Then add in eggs and milk, whisking until combined. This creates a smooth batter that’s bursting with flavor.
Step 5: Fold in Dry Ingredients
Gently fold in self-raising flour, cocoa powder, and baking powder into your mixture. Be careful not to overmix; we want our cupcakes light and airy!
Step 6: Bake Your Cupcakes
Divide the batter evenly among your cupcake cases and bake for 25-30 minutes until a skewer comes out clean from the center. Once baked, leave them to cool completely—this prevents melting any fillings when you drill holes for them!
Step 7: Make Oreo Cheesecake Filling
While those delightful cupcakes cool down, prepare your oreo cheesecake filling by mixing cream cheese, icing sugar, vanilla extract, and crushed Oreos until smooth. This creamy filling adds an unexpected surprise inside each cupcake!
Step 8: Core Your Cupcakes
Using a cupcake corer or knife, make a hole in each cupcake’s center. This will hold all that delicious cheesecake filling we made earlier.
Step 9: Fill with Cheesecake Mixture
Spoon or pipe that scrumptious cheesecake filling into each hole you’ve created in the cupcakes. Each bite will be filled with rich oreo goodness!
Step 10: Whip Up Chocolate Buttercream
Prepare your chocolate buttercream by mixing together softened butter, cocoa powder, icing sugar, and milk until smooth. This decadent frosting will top off our cupcakes beautifully.
Step 11: Create Green Grass Buttercream
For grass decoration, mix butter with icing sugar then add vanilla extract and green food coloring until you reach your desired shade of green—this adds a fun touch of color!
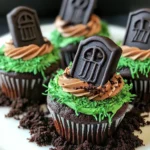
Step 12: Assemble Your Graveyard Scene
Pipe chocolate buttercream onto each cupcake smoothly before adding those biscuit gravestones on top! Sprinkle crushed Oreos in front like soil before piping green grass around each gravestone.
Final Touches
Store your Halloween Graveyard Cupcakes in an airtight container in a cool place until you’re ready to serve them up at your spooky gathering! Enjoy within three days for best taste.
Happy haunting!
Pro Tips for Making Halloween Graveyard Cupcakes
Creating these spooky treats can be a fun experience for you and your loved ones, but here are some tips to ensure they turn out perfectly every time!
- Use Room Temperature Ingredients: Letting your eggs and butter come to room temperature before mixing helps them blend more easily, resulting in a smoother batter and a better rise.
- Don’t Overmix the Batter: Once you add the dry ingredients, mix just until combined. Overmixing can lead to dense cupcakes instead of light and fluffy ones.
- Cool Completely Before Filling: Allow your cupcakes to cool completely before adding the cheesecake filling. This prevents the filling from melting and keeps its delicious texture intact.
- Experiment with Decorations: Feel free to get creative with your graveyard themes! You can use gummy worms or candy spiders for an extra creepy effect—let your imagination run wild!
- Store Properly: For best freshness, store your cupcakes in an airtight container. Keeping them cool will help maintain their flavor and texture, ensuring they taste great even days later.
How to Serve Halloween Graveyard Cupcakes
These Halloween Graveyard Cupcakes are already a treat for the eyes, but presenting them well can take them to another level. Here are some ideas on how to serve these delightful spooky desserts!
Garnishes
- Edible Glitter: A sprinkle of edible glitter on top adds a magical touch that makes your graveyard scene sparkle.
- Candy Corn: Place a few candy corns around the base of the cupcakes to add a pop of color and enhance the Halloween theme.
Side Dishes
- Pumpkin Soup: A warm bowl of creamy pumpkin soup complements the sweetness of the cupcakes while keeping with the autumnal theme.
- Spooky Fruit Salad: Mix seasonal fruits like oranges, apples, and grapes to create a colorful side dish that balances out the richness of the cupcakes.
- Cheese Platter: A selection of cheeses paired with crackers provides a savory contrast to the sweet flavors of the cupcakes.
- Chili: Serve up a hearty chili on the side for those who enjoy something spicy; it’s perfect for fall gatherings and pairs surprisingly well with sweet treats!
With these serving suggestions and pro tips, you’ll have everything you need for a fabulous Halloween gathering. Happy baking!
Make Ahead and Storage
These Halloween Graveyard Cupcakes are perfect for meal prep, allowing you to enjoy festive treats without the last-minute rush. You can prepare the components in advance, making it easy to assemble them when you’re ready to serve.
Storing Leftovers
- Store the cupcakes in an airtight container at room temperature.
- Enjoy them within 3 days for the best flavor and freshness.
Freezing
- For freezing, wrap each cupcake individually in plastic wrap.
- Place wrapped cupcakes into a freezer-safe container or bag.
- They can be frozen for up to 2 months. Thaw them in the fridge overnight before serving.
Reheating
- These cupcakes are best enjoyed at room temperature but can be warmed slightly in the microwave for about 10-15 seconds if desired.
- Avoid overheating to maintain the texture of the frosting and filling.
FAQs
Got questions? Here are some common ones about these Halloween Graveyard Cupcakes:
Can I use different fillings for Halloween Graveyard Cupcakes?
Absolutely! While the Oreo cheesecake filling adds a delicious touch, feel free to experiment with your favorite fillings like pumpkin spice or peanut butter.
How should I store my Halloween Graveyard Cupcakes?
Store your Halloween Graveyard Cupcakes in an airtight container at room temperature and consume them within 3 days for optimal freshness.
Can I make these cupcakes gluten-free?
Yes! Simply substitute the self-raising flour with a gluten-free blend, ensuring that all other ingredients are also gluten-free.
What decorations can I use besides Biscoff biscuits?
You can get creative with decorations! Consider using chocolate cookies, gummy worms, or spooky candy toppers to make your graveyard scene even more fun!
How do I achieve the best texture for my chocolate buttercream?
For fluffy chocolate buttercream, ensure your butter is at room temperature before mixing. Beat it well with icing sugar and cocoa powder until light and creamy before adding milk.
Final Thoughts
I hope you find joy in creating these delightful Halloween Graveyard Cupcakes! They’re not only visually impressive but also bursting with flavor—perfect for sharing with friends and family at any Halloween gathering. Dive into this spooky baking adventure and let your creativity shine! Remember, it’s all about having fun in the kitchen. Enjoy every bite!
Halloween Graveyard Cupcakes
Get ready to impress your guests with these enchanting Halloween Graveyard Cupcakes! These delightful treats feature chocolate cupcakes filled with a creamy Oreo cheesecake center, all topped with rich chocolate and vibrant green buttercream. Perfectly spooky for Halloween parties or family gatherings, these cupcakes are not only fun to make but also a joy to eat. With simple ingredients and easy steps, even little hands can help bring this graveyard scene to life. Whether you’re a seasoned baker or just starting out, this recipe promises a festive treat that everyone will love!
- Prep Time: 30 minutes
- Cook Time: 30 minutes
- Total Time: 1 hour
- Yield: Makes approximately 12 servings 1x
- Category: Dessert
- Method: Baking
- Cuisine: Various
Ingredients
- 12 Lotus biscoff biscuits
- 150 g Dark chocolate (melted)
- 30 g White chocolate (melted)
- 175 g Baking spread or butter (softened, unsalted)
- 175 g Caster sugar
- 3 Eggs (large)
- 2 tbsp Milk
- 150 g Self raising flour
- 25 g Cocoa powder
- 1/4 tsp Baking powder
- 115 g Full fat cream cheese
- 15 g Icing sugar
- 15 g Oreos (crushed)
- 1/8 tsp Vanilla extract
- 100 g Butter (softened, unsalted)
- 165 g Icing sugar
- 35 g Cocoa powder
- 1–2 tsp Milk
- 25 g Butter (softened, unsalted)
- 50 g Icing sugar
- 1/8 tsp Vanilla extract
- Green food colouring
- 35 g Oreos (crushed)
Instructions
- Prepare the biscuit graves by snapping off pieces of biscoff biscuits, dipping them in melted dark chocolate, and allowing them to set.
- Preheat your oven to 140C Fan/160C/325F.
- In a bowl, cream together baking spread and caster sugar until fluffy. Add eggs and milk, mixing well.
- Fold in self-raising flour, cocoa powder, and baking powder until just combined.
- Bake the batter in cupcake cases for 25-30 minutes until a skewer comes out clean. Cool completely.
- Make the Oreo cheesecake filling by mixing cream cheese, icing sugar, vanilla extract, and crushed Oreos until smooth.
- Core cooled cupcakes and fill each with the cheesecake mixture.
- For frosting, prepare chocolate buttercream by mixing softened butter, icing sugar, cocoa powder, and milk until smooth.
- Pipe the frosting onto each cupcake and decorate with biscoff gravestones and crushed Oreos.
Nutrition
- Serving Size: 1 serving
- Calories: 327
- Sugar: 22g
- Sodium: 107mg
- Fat: 16g
- Saturated Fat: 10g
- Unsaturated Fat: 5g
- Trans Fat: 0g
- Carbohydrates: 42g
- Fiber: 1g
- Protein: 4g
- Cholesterol: 54mg