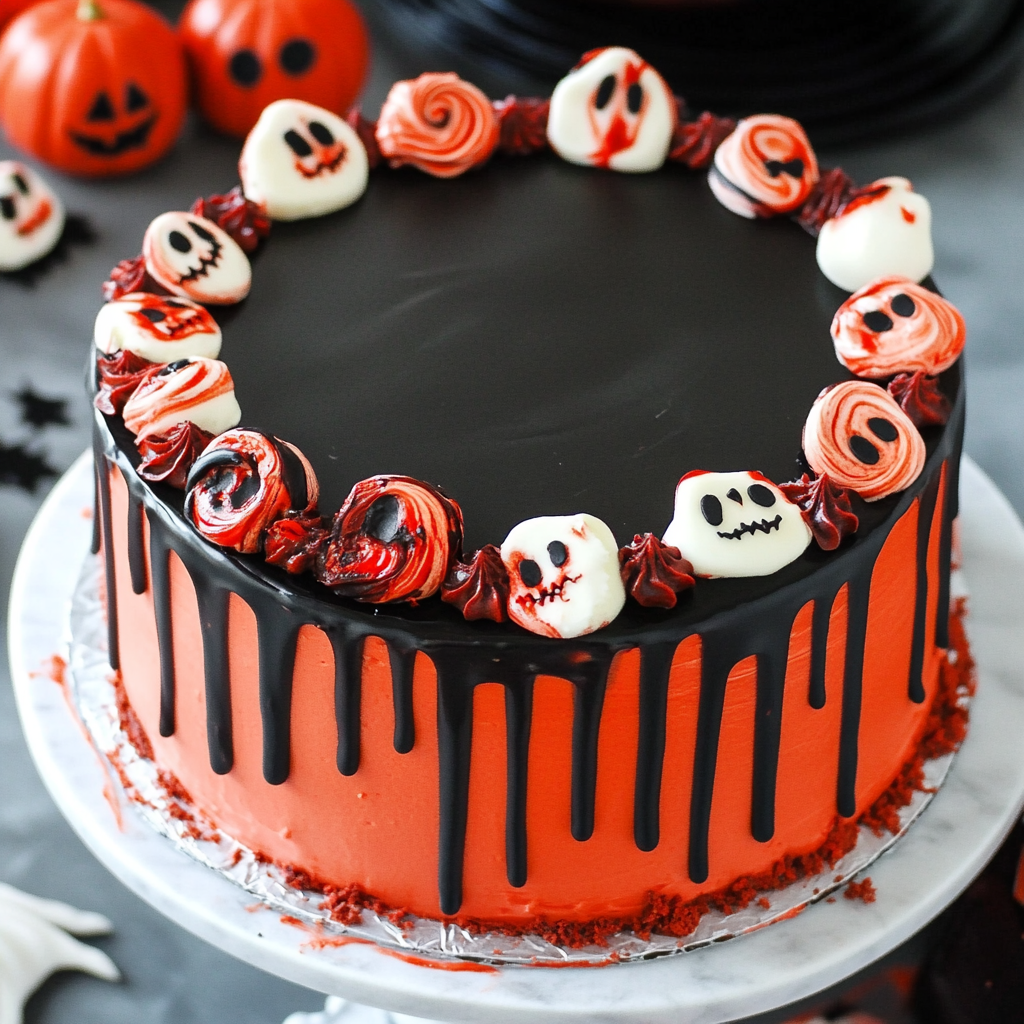
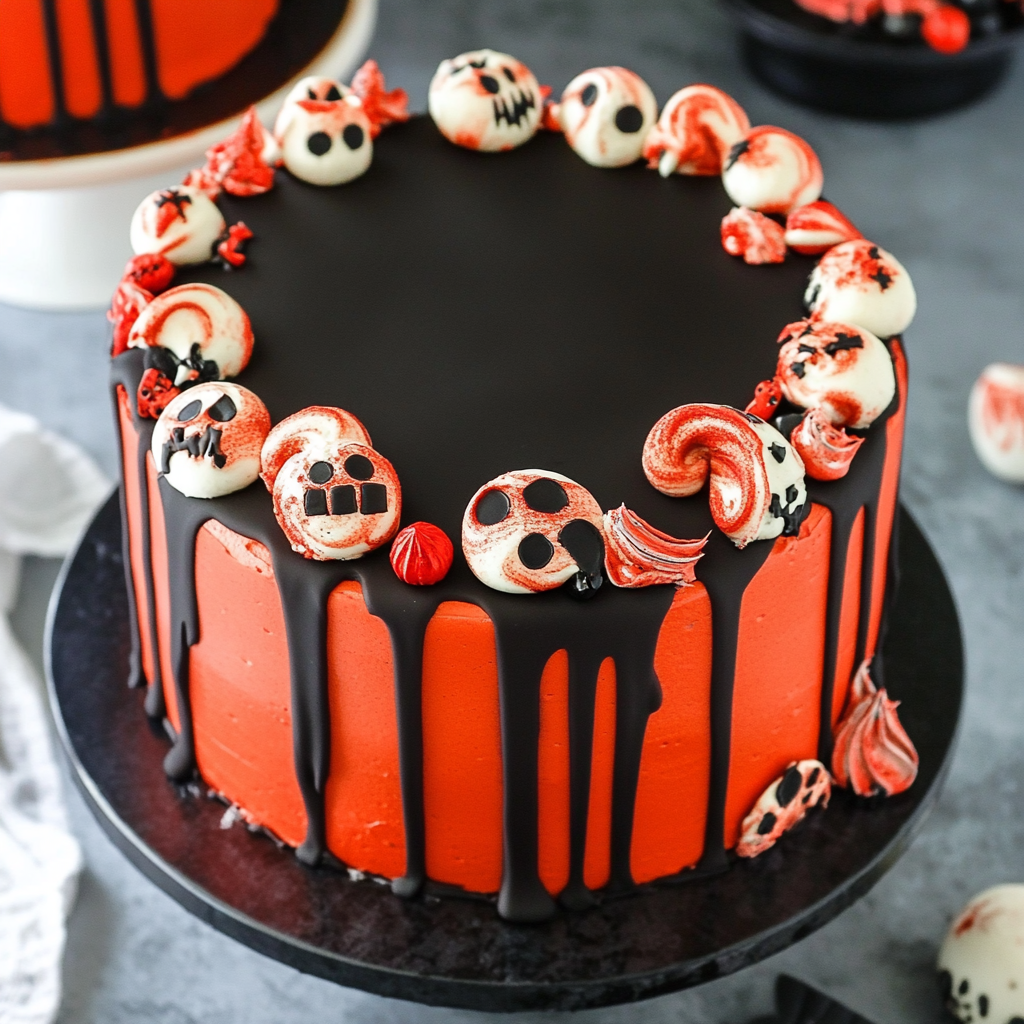
Spooky Halloween Marble Cake
If you’re looking for a show-stopping dessert that will have your guests buzzing with excitement, look no further than this Spooky Halloween Marble Cake! This cake isn’t just about looks; it’s a delicious blend of rich chocolate and vanilla flavors, swirled together in a hauntingly beautiful way. It’s perfect for Halloween parties, family gatherings, or even just a cozy night in while watching your favorite spooky movie. I promise—this cake will be the highlight of any occasion!
The beauty of this recipe lies in its simplicity and the fun you can have decorating it. With drippy red blood, creepy bones, and eyeball sprinkles, this cake will bring some delightful fright to your dessert table.
Why You’ll Love This Recipe
- Eye-catching design: The striking red and black marbling makes it a perfect centerpiece for your Halloween festivities.
- Delicious flavor: The combination of vanilla and bittersweet chocolate creates a mouthwatering treat that everyone will love.
- Fun to decorate: Get creative with toppings! From spooky sprinkles to gooey icing, there are endless ways to personalize your cake.
- Family-friendly: Kids (and adults!) will enjoy helping out with the decorating part—it’s a great way to bond over baking!
- Make-ahead option: Bake the cake ahead of time and store it until you’re ready to decorate, making party prep a breeze.
Ingredients You’ll Need
Let’s gather our simple, wholesome ingredients. Most of these should be staples in your pantry, making this recipe easy to whip up whenever the mood strikes!
For the Cake
- 2 1/4 cups (293g) all purpose flour
- 2 1/2 tsp baking powder
- 1/4 tsp baking soda
- 1/2 tsp salt
- 1/2 cup (112g) unsalted butter, room temperature
- 1/2 cup vegetable oil
- 1 1/2 cups (310g) sugar
- 1 tbsp vanilla extract
- 4 large eggs
- 1 cup (240ml) buttermilk
- 5 oz bittersweet chocolate (60% cacao), chopped
For the Frosting
- 2 1/4 cups (504g) unsalted butter
- 8 cups (920g) powdered sugar
- 1 cup (114g) natural unsweetened cocoa powder
- 2 tsp vanilla extract
- 5-7 tbsp (75-105ml) water/cream
- 1/4 tsp salt
For Decoration
- Black gel icing color
- Red gel icing color
- 4 oz red Wilton candy melts
- 2 tbsp heavy whipping cream
- Sprinkles (see notes)
Variations
This Spooky Halloween Marble Cake is quite versatile! Feel free to experiment with these fun variations:
- Add different flavors: Swap out some vanilla for almond or orange extract for a twist on the classic flavor profile.
- Use different colors: Change up the colors of the icing for other holidays or personal themes—think greens for St. Patrick’s Day!
- Make it gluten-free: Substitute all-purpose flour with a gluten-free blend for an equally delicious option.
- Change up the decorations: Try using themed chocolates or candies instead of sprinkles for unique designs that suit your celebration!
How to Make Spooky Halloween Marble Cake
Step 1: Prepare Your Cake Batter
Start by preheating your oven to 350°F (175°C). Grease and flour two 9-inch round cake pans. In a mixing bowl, whisk together the flour, baking powder, baking soda, and salt. This step is crucial because it ensures your cake rises perfectly during baking.
Step 2: Cream Butter and Sugar
In another bowl, cream together the unsalted butter, vegetable oil, and sugar until light and fluffy. This process introduces air into your batter, giving you that lovely light texture we all adore in cakes. Add in your eggs one at a time, mixing well after each addition.
Step 3: Combine Wet Ingredients
Stir in the vanilla extract and buttermilk until well combined. This mixture brings moisture into your cake while adding flavor.
Step 4: Melt Chocolate
Now it’s time to melt the bittersweet chocolate! You can do this gently in a microwave or over a double boiler until smooth. Let it cool slightly before adding it to half of your batter.
Step 5: Create Your Marble Effect
Divide your batter into two bowls—one plain and one mixed with melted chocolate. Using a spoon or spatula, alternate spoonfuls of each batter into the prepared pans. Use a knife or skewer to swirl them slightly together for that beautiful marble effect!
Step 6: Bake
Bake in your preheated oven for about 20 minutes or until a toothpick inserted into the center comes out clean. Allow them to cool in pans for about 10 minutes before transferring them onto wire racks.
Step 7: Frosting Time!
While your cakes cool completely, let’s make that delicious frosting! Beat together softened butter with powdered sugar and cocoa powder until smooth. Add water or cream as needed for spreading consistency.
Step 8: Decorate Your Cake
Once cooled, spread frosting between layers and around the outside of the cake. Now comes the fun part—add black and red gel icing as desired! Melt red candy melts with heavy cream to create “blood” drips on top.
And there you have it—the ultimate Spooky Halloween Marble Cake ready to impress everyone at your gathering! Enjoy every bite!
Pro Tips for Making Spooky Halloween Marble Cake
Baking can be a delightful adventure, especially when making this Spooky Halloween Marble Cake! Here are some tips to ensure your cake turns out perfectly spooky and delicious.
- Use room temperature ingredients: Ensuring that your butter, eggs, and buttermilk are at room temperature allows for better mixing and a smoother batter, resulting in a fluffier cake.
- Don’t overmix the batter: When incorporating the dry ingredients with the wet, mix just until combined. Overmixing can lead to a dense cake, which is not what we want for our festive treat!
- Experiment with colors: Feel free to adjust the amount of black and red gel icing colors to achieve your desired spooky effect. A vibrant color contrast will make your marble cake more visually appealing!
- Let the cake cool completely: Before decorating, make sure your cake layers have cooled entirely. This prevents the frosting from melting and ensures a neat finish.
- Use a serrated knife for leveling: If you need to level your cake layers, a serrated knife works best! It helps create even layers without tearing the delicate sponge.
How to Serve Spooky Halloween Marble Cake
Serving this Spooky Halloween Marble Cake is all about presentation and pairing it with fun accompaniments. Here’s how you can make it extra special for your Halloween festivities!
Garnishes
- Edible glitter: Sprinkle some edible black or red glitter on top of the frosting to give it an enchanting sparkle that catches the eye.
- Candy eyeballs: Place candy eyeballs on top of each slice for a fun and eerie touch that will delight your guests!
- Chocolate shavings: Add chocolate shavings for an elegant finish that enhances both flavor and texture.
Side Dishes
- Witch’s Brew Hot Chocolate: This creamy hot chocolate topped with whipped cream adds warmth and coziness alongside your cake—perfect for chilly Halloween nights!
- Pumpkin Spice Cookies: These soft, spiced cookies complement the flavors of marble cake beautifully while adding an extra festive flair.
- Ghostly Vanilla Ice Cream: Serve with scoops of vanilla ice cream decorated as ghosts for a delightful contrast in temperature and texture.
- Spooky Fruit Salad: A mix of seasonal fruits like oranges, pears, and dark grapes creates a refreshing side that balances out the sweetness of the cake.
With these tips and serving ideas, you’re all set to impress at your Halloween gathering! Happy baking!
Make Ahead and Storage
This Spooky Halloween Marble Cake is not only a showstopper for your Halloween festivities, but it also makes for excellent meal prep! You can prepare this cake ahead of time and store it for later enjoyment, ensuring that you are ready for any gathering.
Storing Leftovers
- Allow the cake to cool completely before storing.
- Wrap leftovers in plastic wrap or place them in an airtight container.
- Store in the refrigerator for up to 5 days.
Freezing
- Ensure the cake is fully cooled before freezing.
- Wrap individual slices tightly in plastic wrap, then in aluminum foil.
- Freeze for up to 2 months for best quality.
- Thaw overnight in the refrigerator before serving.
Reheating
- If you prefer your cake warm, preheat your oven to 350°F (175°C).
- Place the slices on a baking sheet and cover loosely with foil.
- Heat for about 10-15 minutes or until warmed through.
FAQs
Here are some common questions about making the Spooky Halloween Marble Cake:
Can I make this Spooky Halloween Marble Cake without eggs?
Yes, you can substitute eggs with a mixture of 1/4 cup unsweetened applesauce or 1/4 cup of mashed bananas per egg. This will help maintain moisture and bind your ingredients.
How do I achieve the perfect marble effect in my Spooky Halloween Marble Cake?
To create a beautiful marble effect, alternate spoonfuls of red and black batter into your cake pan. Use a knife to swirl them gently together, but be careful not to over-mix!
Can I decorate my Spooky Halloween Marble Cake differently?
Absolutely! Feel free to get creative with your decorations. Use different colored frosting, spooky sprinkles, or even edible glitter to give it a unique touch that reflects your style.
What if I can’t find black gel icing color?
If black gel icing color is unavailable, you can use a combination of dark cocoa powder and food coloring to achieve a similar shade. Just be sure it’s food-safe!
Final Thoughts
I hope you enjoy making this whimsical Spooky Halloween Marble Cake as much as I do! It’s not just about the delicious flavors; it’s about bringing joy and creativity into your kitchen during this fun season. Whether you’re serving it at a party or enjoying a slice while watching scary movies at home, this cake is sure to be a hit. Happy baking!
Spooky Halloween Marble Cake
Get ready for Halloween with this Spooky Halloween Marble Cake! Deliciously spooky and perfect for any celebration—try it today!
- Prep Time: 30 minutes
- Cook Time: 20 minutes
- Total Time: 50 minutes
- Yield: Approximately 12 servings 1x
- Category: Dessert
- Method: Baking
- Cuisine: American
Ingredients
- 2 1/4 cups all-purpose flour
- 2 1/2 tsp baking powder
- 1/4 tsp baking soda
- 1/2 tsp salt
- 1/2 cup unsalted butter, room temperature
- 1/2 cup vegetable oil
- 1 1/2 cups sugar
- 1 tbsp vanilla extract
- 4 large eggs
- 1 cup buttermilk
- 5 oz bittersweet chocolate, chopped
- For frosting: 2 1/4 cups unsalted butter
- 8 cups powdered sugar
- 1 cup natural unsweetened cocoa powder
- 2 tsp vanilla extract
- 5–7 tbsp water/cream
- 1/4 tsp salt
- Black gel icing color
- Red gel icing color
- 4 oz red candy melts
- 2 tbsp heavy whipping cream
- Sprinkles
Instructions
- Preheat your oven to 350°F (175°C). Grease and flour two 9-inch round cake pans.
- In a bowl, whisk together flour, baking powder, baking soda, and salt.
- In another bowl, cream butter, vegetable oil, and sugar until fluffy. Add eggs one at a time.
- Stir in vanilla extract and buttermilk until combined.
- Melt the bittersweet chocolate and mix it into half of the batter.
- Alternate spoonfuls of each batter into the prepared pans and swirl with a knife for a marble effect.
- Bake for about 20 minutes or until a toothpick comes out clean. Let cool before frosting.
Nutrition
- Serving Size: 1 slice (70g)
- Calories: 340
- Sugar: 34g
- Sodium: 220mg
- Fat: 16g
- Saturated Fat: 8g
- Unsaturated Fat: 7g
- Trans Fat: 0g
- Carbohydrates: 47g
- Fiber: 1g
- Protein: 4g
- Cholesterol: 50mg