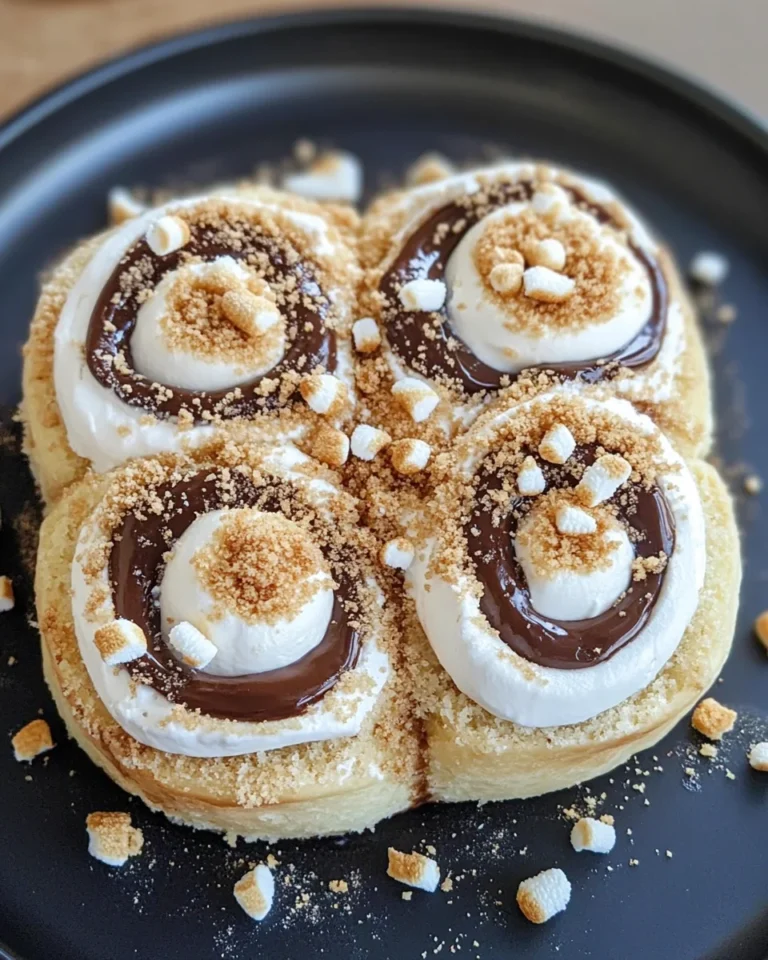
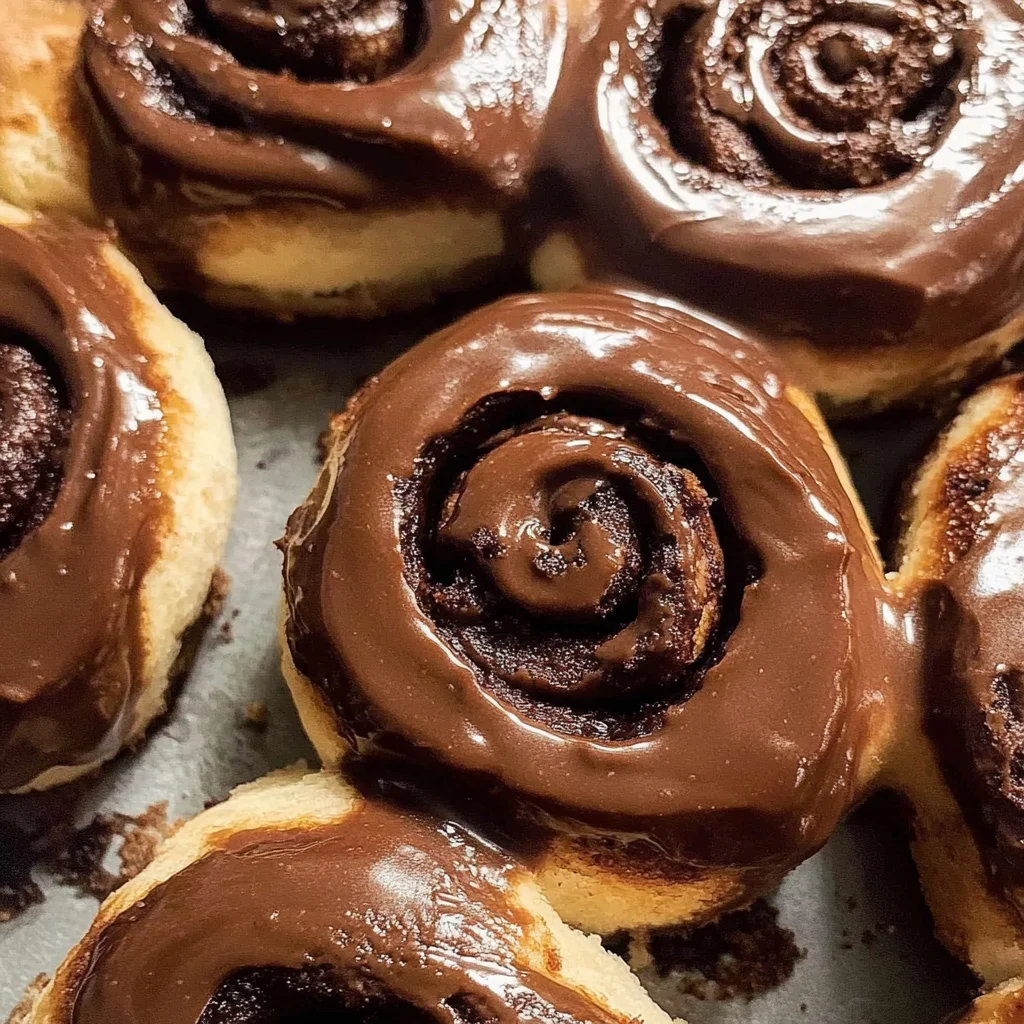
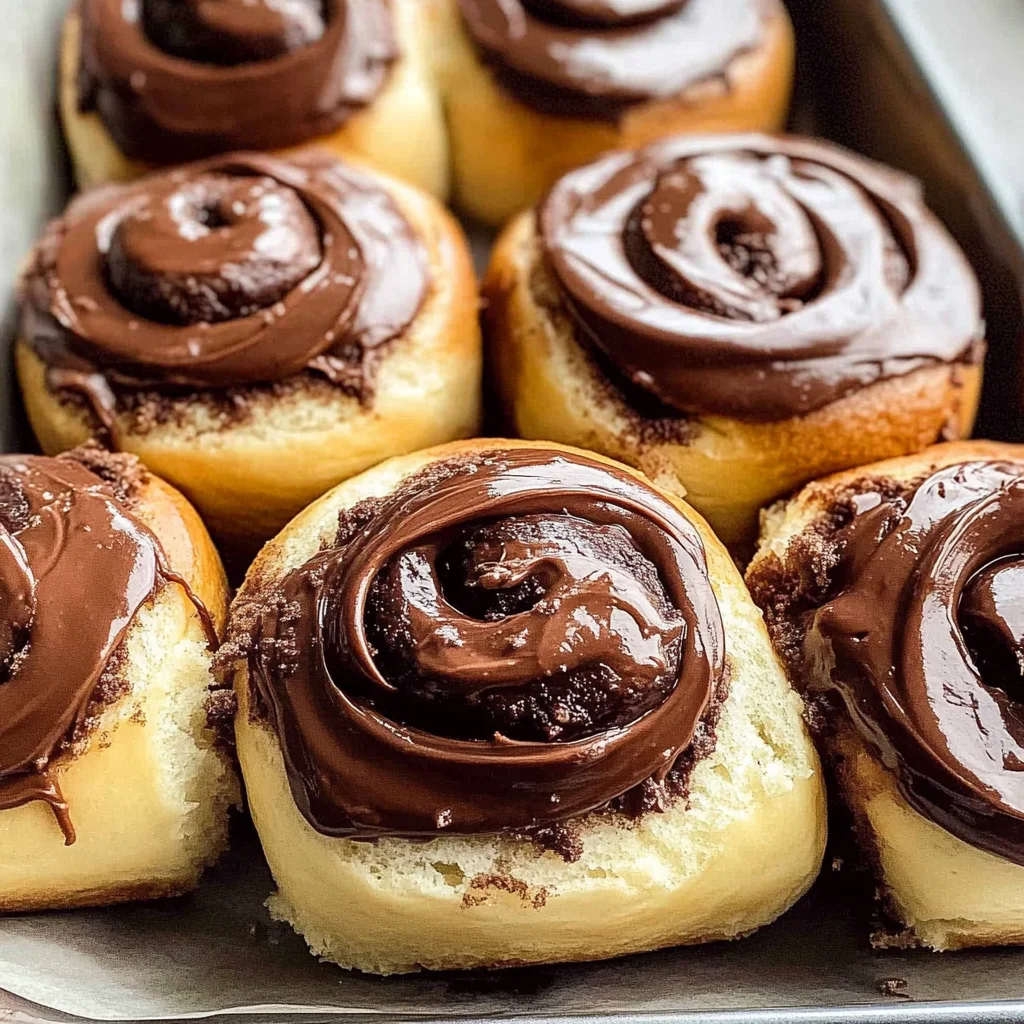
The Best Homemade Chocolate Rolls Recipe
If you’re looking for a delightful treat that will make your kitchen smell heavenly, you’ve landed in the right place! The Best Homemade Chocolate Rolls Recipe is not just a recipe; it’s a warm hug wrapped in soft, chocolatey goodness. These rolls are perfect for any occasion—whether it’s a busy weeknight dinner, a cozy weekend brunch, or a festive family gathering. They are incredibly easy to whip up and will impress everyone at the table!
What makes these chocolate rolls so special is how simple they are to prepare. You’ll be amazed at how quickly you can turn ordinary ingredients into something extraordinary. Trust me, once you take your first bite, you’ll want to make them time and time again!
Why You’ll Love This Recipe
- Easy to Make: With just 30 minutes of prep time, you can have these delicious rolls on the table in no time!
- Family-Friendly: Kids and adults alike will love the rich chocolate flavor, making them a hit with everyone.
- Make-Ahead Option: Prepare the dough earlier in the day and let it rise while you go about your plans—easy peasy!
- Deliciously Versatile: Enjoy them as breakfast or dessert; they’re scrumptious any time of day!
- Perfectly Frosted: The creamy frosting is easy to make and adds the perfect finishing touch.
Ingredients You’ll Need
Let’s gather some simple and wholesome ingredients to create these delightful chocolate rolls! You probably have most of them in your pantry already.
For the Dough
- 1 cup milk, lukewarm (240ml)
- 1/4 cup granulated white sugar (50g)
- 1 tbsp active dry yeast (9g)
- 2 large eggs, room temperature
- 1/4 cup unsalted butter, melted (56g)
- 1 tsp salt
- 3 1/2 to 4 cups all-purpose flour, spooned and leveled (420-480g)
For the Filling
- 1/2 cup light brown sugar, packed (100g)
- 2 tbsp unsweetened cocoa powder
- 2 tsp cinnamon
- 6 tbsp unsalted butter, softened (85g)
- 1 cup semi-sweet chocolate bars chopped or chips (175g)
For the Frosting
- 1/8 cup unsalted butter, room temperature (28g)
- 1/4 cup cream cheese, softened (56g)
- 1 cup powdered sugar, sifted (120g)
- 1/4 cup unsweetened cocoa powder, spooned and leveled (21g)
- 1-2 tbsp milk
Variations
This recipe is wonderfully flexible! Feel free to switch things up with these fun ideas:
- Swap the filling: Try using Nutella or peanut butter instead of chocolate for a different flavor twist.
- Add nuts: Chopped walnuts or pecans can add crunch and extra flavor.
- Spice it up: Add a pinch of nutmeg or cardamom to the filling for a warm spice note.
- Fruity flair: Mix in dried fruit like cranberries or cherries with the filling for added sweetness.
How to Make The Best Homemade Chocolate Rolls Recipe
Step 1: Make the Dough
In a large mixing bowl, combine lukewarm milk, sugar, and yeast using a stand mixer fitted with a whisk attachment. Stir gently and let it sit for about 5-10 minutes until it becomes foamy on top. This step is crucial as it activates the yeast, helping your rolls rise beautifully!
Step 2: Combine Ingredients
Next, add in your eggs, melted butter, and salt. Whisk everything together until fully combined. Then switch to a dough hook and gradually mix in about 3 1/2 cups of flour on medium-low speed until the dough comes together. It should feel slightly sticky but not cling to the sides of your bowl.
Step 3: Knead the Dough
Once your dough is formed, knead it on medium speed for about 5 minutes. This helps develop gluten, giving your rolls that soft texture we all love. Transfer it to a greased bowl, cover with a towel, and let it rest at room temperature for about 10 minutes.
Step 4: Prepare the Filling
While that’s resting, stir together brown sugar, cocoa powder, and cinnamon in a small bowl. This mixture will add sweet layers of flavor inside each roll.
Step 5: Shape Your Rolls
Preheat your oven to 200°F (100°C). Roll out your dough into a large rectangle about 20×18 inches. Spread softened butter over it while leaving an inch border along one edge. Sprinkle that delicious sugar-cocoa mixture evenly over everything before scattering chopped chocolate on top.
Step 6: Roll It Up
Tightly roll up from the long side into a log shape—this part is fun! Cut it into 12 equal pieces and place them on a lined baking sheet without covering them. Turn off your oven and let them rise inside for about 30 minutes until doubled in size.
Step 7: Bake Away!
Once risen, remove them from the oven and preheat it to 375°F (190°C). Bake those beauties for about 20-25 minutes until lightly golden brown. If they start browning too quickly after about 15 minutes, place parchment paper over them.
Step 8: Frosting Time!
While they bake, whip up your frosting by beating butter and cream cheese together until smooth. Gradually add powdered sugar and cocoa powder until well blended; adjust consistency with milk as needed.
Step 9: Enjoy Those Rolls!
Let your freshly baked rolls cool slightly before drizzling that dreamy frosting on top while they’re still warm. I suggest serving them warm—they’re simply irresistible! Store leftovers in an airtight container in the fridge for up to three days; just pop them in the microwave for about 20 seconds before serving again.
Now that you have this recipe down pat, I can’t wait for you to enjoy these homemade chocolate rolls! Happy baking!
Pro Tips for Making The Best Homemade Chocolate Rolls Recipe
Creating the perfect batch of chocolate rolls can be a delightful experience, especially with these helpful tips!
-
Use lukewarm milk: Ensuring your milk is lukewarm (about 110°F or 43°C) helps activate the yeast effectively, leading to a light and fluffy dough.
-
Don’t rush the rise: Allow your dough to rise until it has doubled in size. This step is crucial for achieving that soft, pillowy texture we all love in rolls.
-
Keep it sticky: When mixing your dough, aim for a slightly sticky consistency. A little extra stickiness means tender rolls, while too much flour can leave you with dry results.
-
Cover the rolls while baking: If you notice your rolls browning too quickly in the oven, gently place a piece of parchment paper over them halfway through baking. This protects them from burning while still allowing them to cook through.
-
Serve warm for maximum enjoyment: These chocolate rolls are best enjoyed fresh out of the oven or warmed up. Their gooey chocolate filling shines when served warm!
How to Serve The Best Homemade Chocolate Rolls Recipe
These homemade chocolate rolls are not only delicious but also perfect for sharing! Here are some fun ideas on how to present this delightful dish.
Garnishes
-
Powdered sugar dusting: A light sprinkle of powdered sugar on top adds a sweet touch and makes the rolls look extra inviting.
-
Fresh berries: Adding a few raspberries or strawberries on the side brings a vibrant color and fresh flavor that complements the rich chocolate.
Side Dishes
-
Fresh fruit salad: A mix of seasonal fruits provides a refreshing contrast to the sweetness of the rolls, making it an excellent pairing for breakfast or brunch.
-
Yogurt parfaits: Layering yogurt with granola and fruits creates a balanced option that adds texture and tangy flavor alongside your chocolate rolls.
-
Coffee or tea: Serving these rolls with a cup of freshly brewed coffee or herbal tea enhances their richness and provides a comforting beverage option that pairs wonderfully with sweet pastries.
With these serving suggestions, you can create a delightful experience around your homemade chocolate rolls that everyone will love! Enjoy every bite!
Make Ahead and Storage
These chocolate rolls are perfect for meal prep! You can easily make them in advance to enjoy fresh, warm rolls any time you crave a sweet treat.
Storing Leftovers
- Store leftover chocolate rolls in an airtight container at room temperature for up to 3 days.
- If you prefer, you can refrigerate them; just make sure they are in a sealed container to avoid drying out.
Freezing
- To freeze the rolls, place them in a single layer on a baking sheet and freeze until solid.
- Once frozen, transfer them to a freezer-safe bag or container. They will keep well for up to 2 months.
Reheating
- For best results, reheat individual rolls in the microwave for about 20 seconds until warm.
- You can also reheat them in the oven at 350°F (175°C) for about 10 minutes if you want a crispier texture.
FAQs
If you’re curious about these delicious homemade treats, here are some common questions!
Can I make The Best Homemade Chocolate Rolls Recipe without eggs?
Yes! You can substitute eggs with flaxseed meal or unsweetened applesauce. Use 1 tablespoon of flaxseed meal mixed with 2.5 tablespoons of water per egg as a great alternative.
How do I know when The Best Homemade Chocolate Rolls Recipe is done baking?
The rolls are done when they are lightly browned on top and sound hollow when tapped. If you have a thermometer, the internal temperature should be around 190°F (88°C).
What if I don’t have semi-sweet chocolate bars for The Best Homemade Chocolate Rolls Recipe?
You can use semi-sweet chocolate chips or dark chocolate as an alternative. They’ll melt beautifully and provide that rich flavor we all love!
Can I add nuts to The Best Homemade Chocolate Rolls Recipe?
Absolutely! Chopped nuts like pecans or walnuts can be added to the filling for extra texture and flavor. Just sprinkle them evenly over the butter before rolling.
Final Thoughts
I hope you enjoy making these delightful homemade chocolate rolls as much as I do! They’re not just easy to whip up but also create a cozy atmosphere with their sweet aroma wafting through your kitchen. Perfect for breakfast or dessert, this recipe is sure to impress your family and friends. Happy baking!
The Best Homemade Chocolate Rolls Recipe
Indulge in the irresistible warmth and deliciousness of The Best Homemade Chocolate Rolls Recipe. These soft, fluffy rolls filled with rich chocolate and spiced with cinnamon are perfect for any occasion, whether it’s a cozy brunch or a sweet dessert. With just 30 minutes of prep time, you’ll be amazed at how quickly you can create these delightful treats that fill your kitchen with an enticing aroma. Topped with a creamy frosting, they are sure to impress family and friends alike!
- Prep Time: 30 minutes
- Cook Time: 25 minutes
- Total Time: 55 minutes
- Yield: Serves 12 rolls 1x
- Category: Dessert
- Method: Baking
- Cuisine: American
Ingredients
- 1 cup lukewarm milk
- 1/4 cup granulated white sugar
- 1 tbsp active dry yeast
- 2 large eggs
- 1/4 cup unsalted butter (melted)
- 3 1/2 to 4 cups all-purpose flour
- 1/2 cup light brown sugar (packed)
- 2 tbsp unsweetened cocoa powder
- 2 tsp cinnamon
- 1 cup semi-sweet chocolate chips
- 1/8 cup unsalted butter (room temperature)
- 1/4 cup cream cheese (softened)
- 1 cup powdered sugar (sifted)
- 1/4 cup unsweetened cocoa powder
- 1–2 tbsp milk
Instructions
- In a large bowl, mix lukewarm milk, sugar, and yeast. Let sit until foamy (5–10 minutes).
- Add eggs, melted butter, and salt; whisk to combine. Gradually mix in flour until dough forms.
- Knead the dough on medium speed for about 5 minutes until smooth; let rest covered for 10 minutes.
- Combine brown sugar, cocoa powder, and cinnamon in a bowl.
- Roll out the dough into a rectangle; spread softened butter over it, then sprinkle with the sugar mixture and chocolate chips.
- Roll tightly from long side; cut into 12 pieces and place on a lined baking sheet. Let rise in a warm oven for about 30 minutes.
- Preheat oven to 375°F (190°C) and bake rolls for 20–25 minutes until golden brown.
- For frosting, beat butter and cream cheese together; gradually add powdered sugar and cocoa powder until smooth.
Nutrition
- Serving Size: 1 serving
- Calories: 250
- Sugar: 18g
- Sodium: 150mg
- Fat: 10g
- Saturated Fat: 6g
- Unsaturated Fat: 3g
- Trans Fat: 0g
- Carbohydrates: 35g
- Fiber: 2g
- Protein: 4g
- Cholesterol: 40mg